
Clipper Blade Oil & Maintenance Guide for Professional Barbers (2026)
Complete clipper blade oil and maintenance guide: best oil types compared, step-by-step oiling procedure, daily/weekly/monthly barber maintenance schedule, blade alignment basics, and warning signs your blades need service.
Professional barbers go through dozens of clients a day. Their clipper blades are running for six, eight, sometimes ten hours straight. In that environment, blade oil is not optional maintenance — it is the difference between a blade that lasts 18 months and one that quits in six. As a manufacturer producing over 2 million clipper blades annually for barber brands across North America, Europe, and Asia, we see exactly what separates blades that come back for reorder from blades that come back as warranty complaints. Almost every failure traces back to the same root cause: inconsistent oiling and poor maintenance habits.
This guide is written specifically for professional barbers and groomers who use clippers all day, every day. It covers which oils actually work and why, the correct step-by-step oiling procedure, a practical maintenance schedule you can put on your station wall, how to read the warning signs before a blade fails, and the alignment and tension basics every barber should know.
What Makes a Good Clipper Blade Oil
The blade gap between the moving cutter and stationary comb on a professional clipper is 0.05–0.10mm — roughly the width of a human hair. The oil you use must be thin enough to penetrate this gap through capillary action, chemically stable enough not to gum up under heat, and inert enough not to irritate clients' skin on contact.
Viscosity is the single most important property. Clipper blade oil sits in the ISO VG 5–10 range (5–10 centistokes at 40°C). Compare that to motor oil (ISO VG 32–46) or even sewing machine oil (ISO VG 10–15). If you use something too thick, it pools on the blade surface instead of wicking into the gap — and then traps hair debris, making friction worse, not better.
Clipper Blade Oil Types: Full Comparison
Not all oils are equivalent. Here is a full breakdown of the most common options professionals encounter, rated on the criteria that matter for daily shop use:
| Oil Type | Viscosity (cSt at 40°C) | Lubrication | Corrosion Protection | Food/Skin Safe | Cost per Year* |
|---|---|---|---|---|---|
| Branded clipper oil (Andis, Wahl, Oster) | 5–8 | Excellent | Excellent | Yes | $18–$30 |
| USP-grade mineral oil (pharmacy) | 5–9 | Excellent | Excellent | Yes | $4–$8 |
| Sewing machine oil (clear, odorless) | 8–12 | Very Good | Good | Generally yes (varies) | $5–$10 |
| Baby oil (mineral oil + fragrance) | 6–10 | Good short-term | Good short-term | Yes | $6–$12 |
| Synthetic PAO clipper oil | 4–7 | Excellent | Excellent | Yes | $25–$45 |
| Coconut oil | Solid below 24°C | Poor | Poor | Yes | Avoid |
| WD-40 | Not a lubricant | None (evaporates) | Poor | No | Avoid |
| Cooking / vegetable oils | 30–80 | Poor (too thick) | None | Yes but goes rancid | Avoid |
*Annual cost estimate for one professional barber oiling 5x per day, 250 working days. Branded oil is typically 118ml / 4oz at $8–$12 per bottle.
Step-by-Step Oiling Procedure
Barbers commonly oil only the front teeth and call it done. This is half the job. There are three oiling points on any clipper blade, and neglecting any one of them accelerates wear in a specific way:
Before the First Client (Cold Start Oiling)
- Brush the blade dry. Use a stiff-bristle cleaning brush to clear any debris from the previous session. Never oil a dirty blade — oil over hair debris creates a paste that increases friction.
- Turn the clipper on. The blade must be moving for oil to distribute correctly.
- Apply 1 drop to each side rail. The side rails (guide rails) are the two metal tracks where the cutter slides left-right. These bear the most friction force. Hold the bottle at the rear corner of each rail and let one drop wick in.
- Apply 2–3 drops across the front teeth. One drop on the left third, one in the center, one on the right third. The capillary gap pulls oil inward between the cutter and comb surfaces.
- Run for 10–15 seconds. This distributes oil across the full cutting surface.
- Wipe excess from the face of the blade. Use a clean cloth. Excess oil on the cutting face transfers to hair during cuts — clients notice.
During the Haircut (Mid-Session Oiling)
For barbers doing back-to-back clients on the same blade, oil every 2–3 clients. The trigger is the clipper's pitch: if it sounds higher or louder than when you started, that is metal-on-metal friction telling you to stop and oil now. During extended sessions, a blade coolant spray (Andis Cool Care, Wahl Blade Ice, Oster Kool Lube) provides immediate heat relief, but these products are not a substitute for oil — they evaporate within 60 seconds and leave no lubrication film. Use coolant spray to drop temperature during the session, then re-oil at the break.
After the Last Client (Storage Oiling)
End-of-day oiling serves a different purpose than in-use oiling: it is corrosion prevention during the hours the blade sits idle. Apply a slightly heavier coat — 5–6 drops — across the teeth and side rails. Do not wipe this excess off. The extra oil forms a protective film that displaces moisture overnight. In humid shop environments (air conditioning off, windows open), this step is critical. An unoiled steel blade in a humid bathroom can develop surface oxidation spots within 48 hours.
Professional Barber Maintenance Schedule
Experienced barbers build maintenance into muscle memory. Here is the schedule we recommend for a professional running 8–15 clients per day:
| Frequency | Task | Time Required | Why It Matters |
|---|---|---|---|
| Before first client | Cold-start oiling (6-point method above) | 45 seconds | Replenishes oil displaced during previous session's storage |
| Every 2–3 clients | Touch-up oil (3 drops across teeth only) | 15 seconds | Replenishes oil burned off by heat during continuous use |
| After last client | Brush clean + full 6-point oiling (storage coat) | 90 seconds | Protects bare steel from overnight corrosion |
| Weekly | Deep clean: disassemble blade, blade wash soak, dry, reassemble, oil, check alignment | 5–8 minutes per blade | Removes compacted debris invisible to daily brushing; catches alignment drift early |
| Monthly | Inspect teeth under 10x magnification; check for chips, rounding, corrosion spots; evaluate whether blade needs sharpening | 2–3 minutes per blade | Catches wear before it damages client hair or creates a heat complaint |
| Every 4–6 weeks (heavy use) | Professional sharpening (or blade replacement if sharpened 4+ times) | Send out / 3–5 days turnaround | Restores cutting edge before performance visibly degrades |
Warning Signs Your Blades Need Attention
Blades communicate when they need service. Learning to read these signals prevents both client complaints and blade damage:
Pulling and Snagging
If the clipper is pulling hair instead of cutting cleanly, the root cause is almost always one of three things: dullness (edge no longer sharp), contamination (oil-and-hair paste between cutter and comb), or misalignment (cutter teeth not sitting correctly against comb teeth). Before sending for sharpening, do a full cleaning and re-oiling cycle. In our testing, roughly 30% of "dull" blades restored full performance with cleaning alone — no sharpening needed.
Excessive Heat
A properly oiled blade running at normal duty stays below 40°C (104°F). A dry blade can hit 62–70°C (144–158°F) within 5 minutes of continuous use — hot enough to cause discomfort or a skin burn through direct scalp contact. If a blade feels hot after a single haircut (not a marathon session), it needs oil immediately. If it runs hot right after oiling, the problem is alignment: the cutter is pressing too hard against the comb and creating friction oil cannot fix. See the alignment section below.
Uneven Cutting or "Tracks"
Visible lines or uneven length across a pass indicate either a chipped or bent tooth, or misalignment where one side of the cutter is cutting closer than the other. Check for visibly damaged teeth first. If the teeth look intact, the issue is tension/alignment (addressed below). A blade leaving tracks after proper alignment still needs to be resharpened or replaced — the edge profile has become uneven.
Unusual Sound
A well-maintained blade running in a good clipper has a consistent, medium-pitched hum. Watch for: higher pitch or whine = dry blade, needs oil immediately; grinding or rattling = debris in mechanism or loose assembly, needs disassembly and inspection; intermittent skipping = blade tension too loose or cutter not seating flat.
Visible Rust or Discoloration
Orange surface rust on blade teeth or rails indicates the blade was stored dry or wet. Surface rust caught early (no pitting you can feel with a fingernail) can usually be removed by lapping on a fine-grit stone followed by oiling. Deep pitting means the cutting surface is compromised — replace the blade. Our full cleaning guide covers rust removal in detail.
Blade Alignment and Tension Basics
Most barbers assume that if the blade is attached, it is aligned. In reality, alignment drifts over time from vibration, repeated attachment/removal, and heat cycling. A misaligned blade causes heat, uneven cutting, and accelerated tooth wear — problems no amount of oiling will fix. For a detailed step-by-step on correcting alignment, see our complete blade alignment guide. Here are the essential checks every barber should know:
The Safety Tooth Check (A5 and Snap-On Blades)
On a correctly aligned A5 blade, the safety tooth (the single longer tooth on the comb blade) must sit 1.5–2.0mm to the left of the cutter's left edge. If the cutter overhangs the safety tooth, the exposed cutter teeth can cut skin during clipper-over-comb work. This is the most critical alignment check — it is also a liability issue. Check it every time you attach a blade.
Cutter-to-Comb Gap
The moving cutter's tips should sit 0.5–1.0mm behind the comb's teeth tips — never flush or ahead of them. If the cutter tips are forward of the comb tips, the blade is effectively running uncovered and will cause nicks. Use a small flathead screwdriver to adjust the blade position (for screw-adjusted blades) or re-seat the snap-on mount and test.
Tension Setting
Clipper blade tension (the pressure between cutter and comb) affects both performance and heat. Too loose: the cutter bounces, leaving tracks and uneven cuts. Too tight: friction rises sharply, blade runs hot even when oiled, wear accelerates. On spring-tensioned blades (most professional models), replace the spring when the blade feels floppy or when blade temperature is high despite correct oiling. A new spring costs $2–$5 and is the most overlooked cheap fix in professional clipper maintenance. On screw-tensioned blades, back off the screw one-quarter turn at a time until heat normalizes, then verify the cutter-to-comb gap is still within spec.
How Blade Manufacturing Quality Affects Maintenance
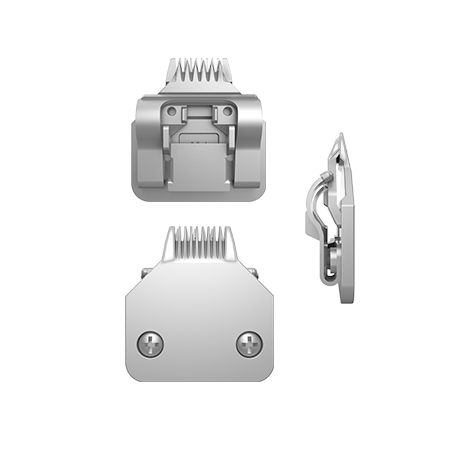
Not all blades are equal in how much maintenance they demand. The manufacturing process sets the baseline. SUMTHIN blades use MIM powder metallurgy to achieve HRC 60–62 hardness — significantly higher than stamped blades at HRC 52–56. This hardness difference has two direct maintenance implications:
- Edge retention: Harder steel deforms less under cutting load, meaning microscopic edge rounding (the primary cause of dulling) happens more slowly. You get 800–1,200 cuts between sharpenings versus 300–500 for softer stamped blades.
- Rail wear resistance: The side rails on MIM blades resist scoring from dry running better than stamped rails. If you forget to oil one session, a MIM blade is more forgiving — the rail surface is harder and less susceptible to microscopic gouging.
Our MIM sintering process achieves 96–99% theoretical metal density, leaving fewer microscopic voids where corrosion can initiate. The practical result: MIM blades stay rust-free longer in humid shop conditions, and oil applied to a dense surface wicks more evenly than on a porous stamped surface.
That said, no manufacturing quality compensates for zero maintenance. Even our best blades, run dry all day, will dull, score, and corrode on the same predictable timeline as any other neglected blade. The math works both ways: properly maintained MIM blades last 3–4x longer than neglected MIM blades, and properly maintained MIM blades outperform neglected premium blades from any manufacturer.
Clipper Blade Oil for Pet Groomers: Same Principles, Higher Frequency
Pet groomers need to oil more frequently than barbers because animal fur presents different friction loads than human hair. Coarse outer coat on many breeds, combined with dander, natural oils, and occasional debris, creates higher blade temperatures and faster lubrication burnoff. Groomer-specific maintenance notes:
- Oil between every dog. Not every 2–3 clients — every single dog. This is especially critical when switching from a fine-coated breed to a coarse-coated one.
- Use blade coolant spray more aggressively. A 2-second burst of cool care spray every 10–15 minutes of continuous use reduces peak blade temperature significantly.
- Watch for lanolin buildup on blades used for wool breeds or livestock — lanolin has a higher viscosity than clipper oil and creates a sticky film if not cleared with blade wash during the weekly deep clean.
- Detachable A5 blades used for pet grooming should be professionally sharpened every 4–6 weeks for heavy-use groomers (6+ dogs/day). Our A5 detachable blade catalog includes all standard sizes (#3F through #40) in both steel and ceramic versions.
Related Guides
- Clipper Blade Oil Guide — Detailed breakdown of oil types, substitutes, and what to avoid.
- How to Align and Adjust Clipper Blades — Step-by-step alignment for A5, snap-on, and taper blades.
- How to Clean Clipper Blades — Complete cleaning, disinfection, and storage protocol.
- Clipper Blade Sharpening: Service vs DIY — When to sharpen, when to replace, and how to find a sharpening service.
- Ceramic vs Steel Clipper Blades — Heat, edge life, and cost comparison for professional use.