
Clipper Blade Tension Spring: How It Works, When to Replace & DIY Fix Guide
Your clipper blade tension spring affects cutting performance more than you think. Learn how blade springs work, signs of a worn spring, and how to replace them on Wahl, Andis, and Oster clippers.
The tension spring is the most overlooked and cheapest-to-replace component in a clipper blade system. It sits between the cutter and the comb, maintaining the precise pressure that keeps the two surfaces in contact during cutting. When this spring weakens — from heat cycling, metal fatigue, or simply age — the blade stops cutting effectively, runs hot, and leaves uneven results. Most barbers and groomers blame the blade or the motor. In our experience as a blade manufacturer, at least 20% of "dead blade" complaints are actually worn tension springs.
How the Tension Spring Works
Clipper blades cut hair through a shearing action: the moving cutter slides across the stationary comb, and hair caught between the teeth of both is sheared. For this to work, the cutter must maintain firm, even contact with the comb surface. The tension spring provides the downward pressure that keeps the cutter pressed against the comb.
Think of it like scissors: if the two scissor blades are loose and wobbly, they bend the hair instead of cutting it. The pivot screw on scissors is the equivalent of the tension spring on clippers — it controls how tightly the cutting surfaces interact.
Types of Tension Systems
| System Type | How It Works | Found On | Adjustable? |
|---|---|---|---|
| Flat leaf spring | Flat metal strip pushes cutter down | Most A5 detachable blades | No — replace when worn |
| Coil spring + screw | Coil spring under an adjustable screw | Oster 76, Oster Titan | Yes — screw adjusts pressure |
| Screw tension (no spring) | Screws directly press cutter to comb | Wahl taper blades, Andis Master | Yes — screw torque sets tension |
| Hinge + catch spring | Snap-on hinge with integrated spring | Some A5 blades, BaByliss FX | No — replace blade or spring |
Signs Your Tension Spring Needs Replacement
Worn tension springs produce a consistent set of symptoms that are often misdiagnosed as dull blades, motor problems, or alignment issues:
- Blade rattles when you shake the clipper: The most obvious sign. Pick up the clipper, shake it gently — if you hear the blade rattle or feel it move, the spring has lost tension.
- Intermittent cutting: The blade cuts on some strokes but misses on others, creating an uneven, choppy result. This happens because the cutter is bouncing off the comb surface instead of maintaining consistent contact.
- The blade cuts fine with manual pressure: If pressing the blade against the client's head improves cutting (because you are physically adding the tension the spring no longer provides), the spring is the problem.
- Excessive heat despite oiling: A loose cutter does not slide smoothly — it chatters across the comb surface, creating irregular friction patterns that generate more heat than smooth sliding contact.
- Blade worked fine until recently: Springs degrade gradually. If a blade that performed well for months starts declining without any other change (same clipper, same oil, same clients), spring fatigue is the most likely cause.
How to Replace a Tension Spring on A5 Detachable Blades
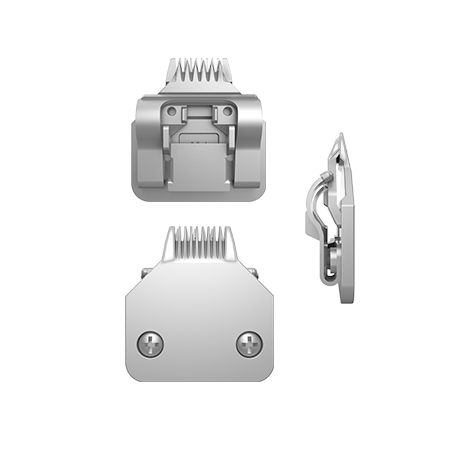
A5 detachable blades use a flat leaf spring that sits inside the blade assembly. Replacing it requires partial disassembly:
- Remove the blade from the clipper.
- Locate the hinge latch — the metal clip at the back of the blade that locks it to the clipper. Some models have a release lever; others require a small screwdriver to pry the latch.
- Separate the cutter from the comb. The cutter lifts off the comb on the hinge. The tension spring is visible once the cutter is lifted — it sits in a channel on the comb plate or on the underside of the cutter.
- Remove the old spring. Note its orientation (which end faces up, which direction the curve faces). Take a photo before removal if needed.
- Install the new spring in the same orientation. The spring should sit flat in its channel without bending or poking out at the edges.
- Reassemble the cutter onto the comb, ensuring the hinge clicks fully into place.
- Test: Shake the blade — no rattle. Press the cutter and release — it should spring back with firm, even pressure. Oil and test on the clipper.
Replacement springs are available from blade suppliers and cost $2–$5 per spring. They are universal within each blade system (all standard A5 springs are interchangeable).
How to Adjust Tension on Screw-Based Systems
Wahl taper blades and Andis screw-mounted blades do not have a separate spring — the mounting screws themselves control tension by how tightly they press the cutter against the comb.
- If tension is too loose (blade rattles, intermittent cutting): Tighten both screws one-quarter turn each, evenly. Test. Repeat until the blade cuts cleanly with no rattle.
- If tension is too tight (blade runs very hot, motor sounds strained): Loosen both screws one-quarter turn each. Test. The blade should feel smooth with no excess heat.
- After adjustment, verify alignment. Changing screw tension can shift the cutter position. Check that cutter teeth sit 0.5–1.0mm behind comb teeth after any tension adjustment.
How to Adjust Tension on Oster Clippers (Coil Spring + Screw)
Oster 76 and Oster Titan use a coil spring under a tension adjustment screw, typically located on the back or bottom of the blade assembly:
- Locate the tension screw (small flathead or hex screw near the blade hinge).
- Turn clockwise to increase tension (tighter cutter-to-comb pressure).
- Turn counterclockwise to decrease tension.
- Adjust in quarter-turn increments and test between each adjustment.
- The correct tension: blade cuts cleanly, no rattle, no excessive heat, motor runs smoothly.
How Long Do Tension Springs Last?
| Usage Level | Estimated Spring Life | Notes |
|---|---|---|
| Home use (1–2 cuts/week) | 3–5 years | Low heat cycling = slow fatigue |
| Professional barber (10–15 cuts/day) | 6–12 months | Daily heat cycling accelerates metal fatigue |
| Professional groomer (6–10 dogs/day) | 4–8 months | Heavier loads + longer sessions = fastest wear |
The main cause of spring fatigue is not mechanical stress — it is heat cycling. During operation, the blade heats to 45–65°C. After use, it cools to ambient. This repeated heating and cooling causes the spring metal to lose its temper (hardness) over hundreds of cycles, gradually reducing the spring force.
Spring Quality and Blade Manufacturing
Not all tension springs are created equal. Cheap aftermarket blades often use springs made from low-grade spring steel that loses tension 3–4x faster than quality springs. SUMTHIN blades use heat-treated spring steel rated for 100,000+ flex cycles — sufficient for 1–2 years of professional daily use. The spring is one of the least expensive components in a blade assembly (material cost under $0.10), but skimping on spring quality causes disproportionate performance degradation.
Related Guides
- Clipper Blade Not Cutting? — 9 causes and fixes (spring tension is cause #5).
- How to Align & Adjust Clipper Blades — Alignment and tension adjustment for all types.
- Clipper Blade Oil Guide — Lubrication that works with (not against) proper tension.