
How to Replace Wahl Clipper Blades: Step-by-Step Guide [2026]
Step-by-step instructions for replacing Wahl clipper blades, including the 2-hole system, spring assembly, blade alignment, and troubleshooting common issues.
Wahl clippers are among the most widely used professional clippers worldwide — from the iconic Wahl Senior and Magic Clip to the workhorse Wahl KM series for pet grooming. Knowing how to properly replace the blade on your Wahl clipper is a fundamental skill that affects cut quality, blade longevity, and your own safety.
This guide covers the two main Wahl blade systems (the 2-hole standard system and the KM snap-on A5 system), with step-by-step instructions for removal, spring installation, alignment, and troubleshooting. We manufacture compatible blades for both systems, so we know exactly how these mechanisms work from the engineering side.
Wahl Blade Systems: Which One Do You Have?
Wahl uses two distinct blade mounting systems. Before starting, identify which one your clipper uses:
| System | Wahl Models | Blade Attachment |
|---|---|---|
| 2-Hole Standard | Senior, Magic Clip, Legend, Designer, Super Taper, Balding Clipper, all corded/cordless barber models | Two screws secure blade to clipper body; blade and spring are separate pieces |
| A5 Snap-On (KM Series) | KM2, KM5, KM10, Bravura, Arco, all Wahl pet/animal clippers | Blade snaps directly onto clipper hinge — no screws needed |
How to Replace Wahl 2-Hole Clipper Blades (Barber Models)
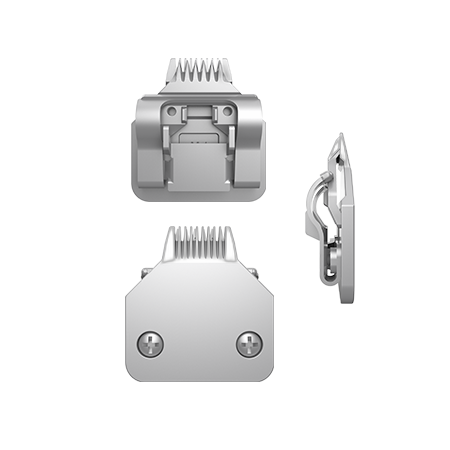
The 2-hole system is used on virtually all Wahl barber clippers. The blade assembly consists of three parts: the stationary blade (bottom, with teeth pointing forward), the cutting blade (top, smaller, slides left-right), and the blade spring (tension mechanism underneath the cutting blade).
Step 1: Remove the Old Blade
- Unplug the clipper or turn it off (obvious, but people skip this and get nicked).
- Locate the two screws on the underside of the blade, near where it meets the clipper body.
- Using a #1 Phillips screwdriver, loosen both screws. You do not need to remove them completely — just loosen enough that the blade assembly slides free.
- Carefully slide the entire blade assembly (stationary blade + cutting blade + spring) away from the clipper body.
- Note the spring's position and orientation. Take a photo if this is your first time — it will save frustration during reassembly.
Step 2: Understand the Spring Assembly
The blade spring is the most misunderstood component. It serves two functions:
- Tension: It presses the cutting blade against the stationary blade with the right amount of force — typically 1.5-2.5 N (150-250 grams-force). Too little pressure and the blade won't cut; too much and it drags, overheats, and wears prematurely.
- Drive coupling: The spring's tab connects to the clipper's drive mechanism (the eccentric pin), converting rotary motor motion into the side-to-side cutting stroke of approximately 1.2-1.8mm travel.
Step 3: How to Assemble Wahl Clipper Blades with Spring
- Place the stationary blade face-down on a clean, flat surface with the teeth pointing away from you.
- Position the spring on the back of the stationary blade. The flat part of the spring sits against the blade; the bent tab (drive arm) should point upward.
- Place the cutting blade on top, aligning the two screw holes with the corresponding holes in the stationary blade. The cutting blade sits between the spring and the stationary blade — the spring pushes the cutting blade forward into contact with the stationary blade's teeth.
- Hold the assembly together and slide it onto the clipper body, threading the two screws through the blade holes into the clipper's screw posts.
- Ensure the spring's drive tab engages the drive slot on the clipper body. You should feel it click or seat into the slot. If you have to force it, the spring is misaligned.
- Tighten the screws partially — do not fully tighten yet. You need room to align the blade first.
Step 4: Align and Zero-Gap the Blade
Blade alignment is critical for both cut quality and safety. A misaligned blade can nick skin or leave uneven cuts.
- Look at the blade from the front. The cutting blade teeth should be 0.5-1.0mm below the tips of the stationary blade teeth. The cutting blade teeth must never protrude beyond the stationary blade — this causes cuts and nicks.
- For a "zero-gap" setup (popular for fading and lining): slide the cutting blade until its teeth are perfectly flush with the stationary blade teeth — touching but not protruding past them. This gives the closest possible cut without skin contact.
- Once aligned, hold the blade in position and tighten both screws firmly. Alternate between screws (tighten one a half turn, then the other) to maintain even pressure.
- Turn the clipper on and test. The blade should run smoothly without excessive noise, vibration, or clicking.
How to Replace Wahl KM (A5 Snap-On) Blades
If you have a Wahl KM2, KM5, KM10, or any Wahl animal clipper, you are using the A5 universal blade system. Replacement is dramatically simpler — no screws, no spring, no alignment needed:
- With the clipper off, press the blade release latch (located on the clipper body behind the blade).
- The old blade snaps off. Set it aside.
- Take the new A5 blade, align the hinge groove with the clipper's blade hinge, and press firmly until it clicks into place.
- That is it. The A5 system is designed so blades are interchangeable with no adjustment needed.
All SUMTHIN A5 blades are compatible with Wahl KM series clippers. See our complete Wahl compatibility chart for the full model list.
Troubleshooting Common Wahl Blade Issues
Blade chatters or vibrates after installation
This almost always means the spring is not seated correctly. Remove the blade, recheck spring orientation, and reinstall. Also check that the drive tab is fully engaged in the clipper's drive slot.
Blade runs but doesn't cut
Three possible causes: (1) The cutting blade is not making contact with the stationary blade — check spring tension. (2) The blade is dull and needs sharpening — see our sharpening guide. (3) The blade alignment is off — the teeth may be too far apart to trap and cut hair.
Blade gets hot quickly
Insufficient oiling or excessive spring tension. Apply 4-5 drops of blade oil (see our clipper blade oil guide), let the clipper run for 10 seconds, and test again. If the blade still overheats, the spring may be deformed and need replacement.
Screws won't stay tight
The screw posts on the clipper body may be stripped. Try a slightly longer screw. If the posts are badly stripped, a drop of thread-lock compound (blue Loctite) on the screws will hold them in place while still allowing future removal.
When to Replace vs. Sharpen Wahl Blades
Not every performance issue requires a new blade. Here is a quick decision guide:
| Symptom | Fix |
|---|---|
| Blade pulls hair but teeth look intact | Sharpen — teeth are dull but structurally fine |
| Visible chips or broken teeth | Replace — damaged teeth cannot be sharpened back |
| Blade has been sharpened 4-5 times | Replace — teeth height is too reduced for effective cutting |
| Cutting rail is scored or grooved | Replace — rail damage causes uneven cutter travel |
| Rust on teeth or cutting surface | Replace — surface corrosion compromises hardness and hygiene |
SUMTHIN MIM powder metallurgy blades (HRC 60-62) last significantly longer than standard stamped Wahl blades (HRC 54-58). Our blades can typically be sharpened 4-5 times before replacement, compared to 2-3 times for standard blades. Browse our Wahl-compatible replacement blades for professional-grade options, or learn more about our blade manufacturing process.