
How to Replace & Install Andis Clipper Blades: Complete Guide [2026]
Complete guide to replacing Andis clipper blades — covering A5 snap-on, 2-hole barber blades, T-Outliner, and UltraEdge vs CeramicEdge differences.
Andis produces some of the most popular clippers in both the barber and pet grooming industries — from the Andis Master and T-Outliner to the AGC Super 2-Speed and Excel 5-Speed. Each uses a slightly different blade attachment system, and knowing which one you have determines how you replace the blade.
This guide covers all Andis blade replacement methods: the A5 snap-on system (most Andis pet clippers), the 2-hole screw system (Andis barber models), and the unique T-Outliner blade replacement. We manufacture compatible blades for all these systems, so the instructions reflect what we know works from an engineering and production standpoint.
Andis Blade Systems Overview
| System | Andis Models | Blade Type | Replacement Difficulty |
|---|---|---|---|
| A5 Snap-On | AGC, AGR+, Excel, Pulse ZR II, DBLC-2, most animal clippers | UltraEdge / CeramicEdge / ShowEdge | Easy — no tools |
| 2-Hole Screw | Master, Envy, Fade Master, Supra ZR | Standard 2-hole barber blade | Moderate — screwdriver needed |
| T-Blade / Outliner | T-Outliner, GTX-EXO, Slim Line Pro | T-blade or deep-tooth blade | Moderate — screwdriver needed |
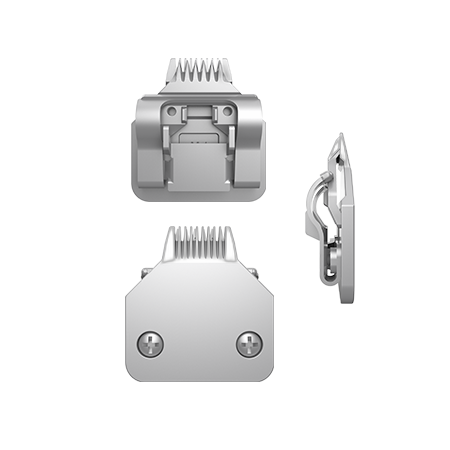
How to Replace Andis A5 Snap-On Blades (Pet Clippers)
The A5 system is the simplest blade system in the industry. Andis adopted the A5 standard (originally developed by Oster in the 1960s) for their entire professional animal clipper line. Every A5 blade from any manufacturer — Andis, Oster, Wahl KM, SUMTHIN — is cross-compatible.
Removal
- Turn the clipper off.
- Hold the clipper body in one hand. With the other hand, grasp the blade near the hinge (the back edge where the blade meets the clipper).
- Push the blade release lever (a small lever or button on the clipper body, directly behind the blade hinge).
- The blade pops free. On some models, you can also simply pull the blade forward and away from the hinge — it unclips with a firm pull.
Installation
- Take the new blade and locate the hinge groove on its back edge — this is the narrow channel that hooks onto the clipper's hinge bar.
- Align the hinge groove with the clipper's hinge bar at approximately a 30-45 degree angle.
- Press the blade firmly toward the clipper body. You should hear and feel a distinct click when the blade locks into place.
- Gently pull the blade to confirm it is locked. It should not move or wobble.
- Turn the clipper on — the blade should run immediately with no alignment needed.
UltraEdge vs CeramicEdge: Does Replacement Differ?
Andis markets two main A5 blade lines: UltraEdge (all-steel) and CeramicEdge (ceramic cutter + steel comb). The replacement process is identical — both use the same A5 snap-on hinge. The differences are in performance, not installation:
| Feature | UltraEdge (Steel) | CeramicEdge (Ceramic) |
|---|---|---|
| Cutter material | Carbon steel, HRC 58-60 | Zirconia ceramic |
| Heat generation | Standard — needs regular cooling | 75% less heat — stays cool longer |
| Edge life | Standard — sharpen every 4-6 weeks | 3-5x longer between sharpenings |
| Drop resistance | Good — steel flexes on impact | Fragile — ceramic can chip if dropped on hard floor |
| Installation | A5 snap-on | A5 snap-on (identical) |
For a deep dive into which material is best for your workflow, see our ceramic vs steel clipper blades comparison. All SUMTHIN ceramic blades are compatible with both UltraEdge and CeramicEdge mounting systems.
How to Replace Andis 2-Hole Barber Blades (Master, Envy, Fade Master)
Andis barber clippers use the standard 2-hole screw system — virtually identical to the Wahl 2-hole system. The process is:
- Turn the clipper off and unplug.
- Loosen the two blade screws on the underside using a #1 Phillips screwdriver. Loosen only — do not remove completely.
- Slide the blade assembly off the clipper body, noting the spring position and orientation.
- Transfer the spring to the new blade: Place the stationary blade face-down. Position the spring flat on its back with the drive tab pointing up. Place the cutting blade on top, aligning screw holes.
- Slide the assembly onto the clipper body, ensuring the spring drive tab engages the drive slot.
- Align the blade: The cutting blade teeth should sit 0.5-1.0mm below the stationary blade tips. For zero-gap (fading/lining): slide the cutting blade flush with the stationary blade tips.
- Tighten screws firmly, alternating between the two for even pressure.
- Test: Turn the clipper on. Listen for smooth operation — any chatter or clicking means the spring is not seated correctly.
How to Replace Andis T-Outliner Blades
The Andis T-Outliner and GTX-EXO use T-shaped blades optimized for outlining, edging, and detail work. The T-blade is wider than the clipper body (approximately 40mm cutting width vs the typical 46mm of a full-size blade), with exposed corners designed for precision line work.
- Turn the clipper off.
- Remove the single screw (center, on the front face of the blade). Some T-Outliner models use two screws — remove both.
- Lift the blade set straight off. Note the small drive fork or blade drive that connects to the motor — it sits in a notch on the moving blade.
- Place the new blade set: Align the moving blade's drive notch with the clipper's drive fork. The blade should sit flat against the clipper face.
- Replace the screw(s) and tighten. The T-Outliner does not require alignment in the same way that a standard barber blade does — the screw position determines the blade position.
- Test: The blade should move smoothly with the characteristic fine, rapid stroke of an outliner.
Common Andis Blade Installation Mistakes
- Forcing an A5 blade that doesn't click. If the blade doesn't snap on smoothly, check for debris on the hinge bar or a bent hinge spring. Never force it — a poorly seated blade can fly off during use.
- Misaligning the spring on 2-hole blades. The drive tab must sit inside the drive slot, not beside or on top of it. About 25% of "defective blade" complaints we receive trace back to this single error.
- Forgetting to oil the new blade. New blades ship with a light protective coating, but they still need 3-4 drops of blade oil before first use. Run the clipper for 10 seconds to distribute the oil.
- Over-tightening screws. This warps the blade, causing uneven cutting. Tighten firmly but not to the point where the screwdriver starts to slip.
Signs You Need a New Andis Blade (Not Just Sharpening)
- Teeth are visibly chipped, broken, or missing — especially on the outer corners of T-blades
- The blade has been sharpened 4-5 times (teeth are now too short for effective cutting)
- The A5 hinge groove is worn or cracked — the blade no longer clicks firmly into place
- Visible rust or pitting on the cutting surface — compromises both performance and hygiene
- The cutting rail shows grooves or scoring — this causes the cutter to travel unevenly, producing inconsistent cuts
For the full blade size chart to help you select the right replacement size, see our dedicated guide. You can also check our Andis compatibility chart for exact model-to-blade matching.